
# 一、哈希表
# 1、认知
哈希表通常是基于 数组 进行实现的,但是相对于数组,它可以非常快速的进行 插入-删除-查找 操作
其核心就是:生成一个与数据项相关联的 下标值,这样就可以快速的查找数据项了。
# 2、特点
哈希表的产生,肯定是为了解决一些问题:
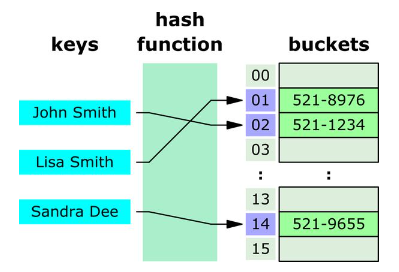
如下图,Hash Table 在进行 插入-删除-查找 时,相对于数组、链表而言,效率就高得多
应用场景
比如:现在公司要求你存储 1000 个员工的姓名,但直接使用数组时,查找效率会非常低。

# 二、哈希索引获取
参考:https://medium.com/@edwin.cloud/hash-tables-simplified-93e378b7a3e8
# 1、核心思路
哈希表是一种数据结构,用于存储键值对(key-value),其方式可以通过使用哈希函数生成的特定索引(hashIndex)(称为哈希)快速访问。
# 1、哈希冲突
- 开放地址法:寻找空白的单元格来放置冲突的数据项
线性探测(+1、聚集问题)、二次探测(+n)、再哈希法(
constant - ( key % constant))
- 链地址法
拓展:效率(填充因子(
N / arrayLength))、扩容、质数
提示
Java 中的 HashMap 采用的就是链地址法。其hashIndex的计算公式为:
hashIndex = hashCode & (length - 1) # 可以通过变化(length - 1)进行扩容
# 2、霍纳法则
我们可以使用 幂的连乘 的方式将带存储的数据转换为 数字(哈希值),但其值可能会变得很大。
所以,我们可以通过通过霍纳法则(中国称之为秦九韶算法),可以将时间复杂度从 O(N²) 下降到了 O(N)。
N 次幂的底数,这里我们选则 质数 31 (分离分别更均匀,也建议使用质数)
# 数据:Jay --> 74 97 121 # 编码转换(可以选择任意的编码方案(ASCII等),甚至是自定义的编码系统)

# 幂的连乘
74 * 31² + 97 * 31¹ + 121  # O(N²)

# 霍纳法则 ✨
((74 * 31) + 97) * 31 + 121  # O(N)
提示
通过霍纳法则,我们可以更为巧妙的得到 hashCode
hashCode = 31 * hashCode + key.charCodeAt(i)
# 3、哈希函数
图示:
- 编写获取 hashIndex 的函数
/**
 *
 * @param key 每一个item项的数据值
 * @param length 设置的哈希表的长度
 * @returns
 */
export function generateHashIndex(key: string, length: number = 7): number {
  let hashCode = 0

  for (let i = 0; i < key.length; i++) {
    // 霍纳法则
    hashCode = 31 * hashCode + key.charCodeAt(i) // 使用的是ASCII码
  }

  const hashIndex = hashCode % length

  return hashIndex
}
- 测试示例
import { generateHashIndex } from '../HashTable'

// 填充因子loadFactor = 6 / 11 = 0.54...
console.log(generateHashIndex('xxx', 11)) // 8
console.log(generateHashIndex('iii', 11)) // 7
console.log(generateHashIndex('jjj', 11)) // 10
console.log(generateHashIndex('fff', 11)) // 9
console.log(generateHashIndex('www', 11)) // 5
console.log(generateHashIndex('vvv', 11)) // 2
# 三、设计实现
参考:https://www.freecodecamp.org/news/javascript-hash-table-associative-array-hashing-in-js/
# 1、哈希表结构
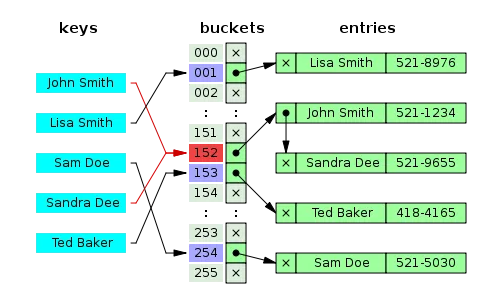
通过上面的哈希函数获取 buckets 的 hashIndex,其中 bucket 有我们传入的 key 和 value 组成
value 是我们真正的数据,而 key 值可以随便写(与数据相关联即可,类似于对象),通过 key 我们可以获取到 hashIndex,进而获取到存储 value 对应的 bucket
# 2、哈希表设计
根据上图,我们可以构建哈希表如下:
class HashTable<T = any> {
  // 数组的用于链式存储bucket的链(数组)
  private buckets: [string, T][][] = []
  // 数组中已存放的bucket个数
  private count: number = 0

  // 数组的长度
  private length: number = 7

  // 提示:填充因子 loadFactor = count / length,当loadFactor>0.75时,我们会进行扩容操作
}

export default HashTable
# 3、哈希表实现
class HashTable<T = any> {
  // ……

  // ---

  // -----------------------
  // -----------------------

  // 根据 key 生成对应的 hashIndex索引
  private generateHashIndex(key: string, length: number = 7): number {
    let hashCode = 0

    for (let i = 0; i < key.length; i++) {
      // 霍纳法则
      hashCode = 31 * hashCode + key.charCodeAt(i) // 使用的是ASCII码
    }

    const hashIndex = hashCode % length

    return hashIndex
  }

  // -----------------------
  // -----------------------

  // 1、插入/修改
  put(key: string, value: T) {
    // 生成hashIndex索引
    const index = this.generateHashIndex(key, this.length)
    // 找到对应的bucket
    let bucket = this.buckets[index]

    // 1、bucket无值的情况 -- 判断bucket是否有值(判断是否链式追加)
    if (bucket === undefined) {
      bucket = []
      this.buckets[index] = bucket
    }

    // 2、更新key的情况 -- 判断是追加还是覆盖
    let isUpdate = false
    for (let i = 0; i < bucket.length; i++) {
      const tuple = bucket[i]
      const tupleKey = tuple[0]

      if (tupleKey === key) {
        tuple[1] = value
        isUpdate = true // 标记一下
      }
    }

    // 3、新增key的情况 -- 判断是追加还是覆盖
    if (!isUpdate) {
      bucket.push([key, value])
      this.count++
    }
  }

  // 2、获取
  get(key: string): T | undefined {
    // 生成hashIndex索引
    const index = this.generateHashIndex(key, this.length)
    // 找到对应的bucket
    let bucket = this.buckets[index]

    // 1、bucket无值的情况
    if (bucket === undefined) return undefined

    // 2、遍历bucket
    for (let i = 0; i < bucket.length; i++) {
      const tuple = bucket[i]
      const tupleKey = tuple[0]

      if (tupleKey === key) {
        return tuple[1]
      }
    }
  }

  // 3、删除
  delete(key: string): T | undefined {
    // 生成hashIndex索引
    const index = this.generateHashIndex(key, this.length)
    // 找到对应的bucket
    let bucket = this.buckets[index]

    // 2、遍历bucket
    for (let i = 0; i < bucket.length; i++) {
      const tuple = bucket[i]
      const tupleKey = tuple[0]

      if (tupleKey === key) {
        bucket.splice(i, 1)
        this.count--

        return tuple[1]
      }
    }
  }

  // ---
}
# 4、哈希表扩容
class HashTable<T = any> {
  // ……

  // ---

  // -----------------------
  // -----------------------

  // 根据指定的newLength长度进行 扩容/缩容 操作
  private resizeChange(newLength: number) {
    const oldBuckets = this.buckets
    let newPrime = newLength

    // newLength 最小值约束
    if (newPrime < 7) newPrime = 7

    // 确保传入的是一个质数
    while (!this.isNewLengthPrime(newPrime)) {
      newPrime++
    }

    // console.log(newPrime)
    this.length = newPrime
    this.buckets = []
    this.count = 0

    // 重新存放数据
    oldBuckets.forEach((bucket) => {
      if (!bucket) return

      for (let i = 0; i < bucket.length; i++) {
        const tuple = bucket[i]
        this.put(tuple[0], tuple[1])
      }
    })
  }

  // 判断传入的newLength是否为质数
  private isNewLengthPrime(newLength: number) {
    const sqrt = Math.sqrt(newLength)
    for (let i = 2; i <= sqrt; i++) {
      // 判断是否能被除了 1 和 sqrt 以外的数 整除
      if (newLength % i === 0) {
        return false
      }
    }

    return true
  }

  // -----------------------
  // -----------------------

  // 1、插入/修改
  put(key: string, value: T) {
    // ……

    // 3、新增key的情况 -- 判断是追加还是覆盖
    if (!isUpdate) {
      bucket.push([key, value])
      this.count++

      // 是否进行扩容操作
      const loadFactor = this.count / this.length
      if (loadFactor > 0.75) {
        this.resizeChange(this.length * 2)
        // console.log(this.buckets)
      }
    }
  }

  // 3、删除
  delete(key: string): T | undefined {
    // 生成hashIndex索引
    const index = this.generateHashIndex(key, this.length)
    // 找到对应的bucket
    let bucket = this.buckets[index]

    // 2、遍历bucket
    for (let i = 0; i < bucket.length; i++) {
      const tuple = bucket[i]
      const tupleKey = tuple[0]

      if (tupleKey === key) {
        bucket.splice(i, 1)
        this.count--

        // 是否进行扩容操作
        const loadFactor = this.count / this.length
        if (loadFactor < 0.25 && this.length > 7) {
          this.resizeChange(Math.floor(this.length / 2))
          // console.log(this.buckets)
        }

        return tuple[1]
      }
    }
  }

  // ---
}