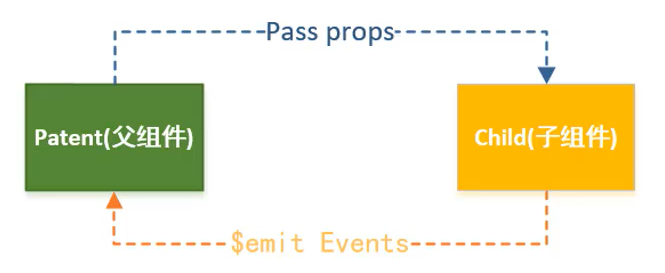
如下图所示,自定义事件/属性 可以用于 父组件 和 子组件 间的数据通信。
子传父的场景中,在 vue 中可以通过多种方式实现(自定义事件、props、$on 等),但其本质都是差不多的

# 一、自定义事件 ✍
上面,我们通过 props 属性实现了:
子组件中的某些数据由父组件操作(父向子)
提示
无论是父传子还是子传父,站在接收者或者需求发起者的角度思考问题可能会更好理解和记忆。
或者说,组件间通信是需要“桥梁”的(vc、main.js 等)
# 1、需求分析
同样是父子组件中的问题,我们能不能 在子组件中 设置一个向父组件传递数据的 '触发键',供我们在需要的时候调用?
答案
可以使用 props 属性进行巧妙的实现:让父组件传递的数据类型为function的函数,然后在子组件中使用函数 😂props:利用函数参数间接达到传值目的。(JSONP 实现原理类似 👀)
当然,我们也可以在父组件中使用 v-on 对<hello-world/>组件的 vc 绑定自定义事件,然后由子组件通过$emit触发即可。
进一步,我们还可以在生命周期钩子 mounted 中,使用$on,对指定自定义事件进行监听
上面答案中解决问题的核心都是,在父组件中为子组件 vc 身上定义一个回调函数/自定义事件 get-xxx-F作为触发键),供子组件在指定的时机/函数中调用。
- 子组件触发事件回调
{
  props: ['getHelloMsgF1'],
  methods: {
    sendHelloMsg1() {
      // 调用回调函数 - 方式1
      this.getHelloMsgF1(this.msg)
    },

    sendHelloMsg2() {
      // 调用回调函数 - 方式2
      this.$emit('getHelloMsgF2', this.msg)
    }
  }
}
提示
上面我们也看到了,我们可以在子组件中通过$emit 发送一些事件,供其他父组件们调用。
# 2、与 props 的区别
使用props和v-on两种方式,区别就是:
- 使用 props 时,父组件向子组件传递的回调函数,子组件得马上用 props 属性接收。
- 使用 v-on 时,父组件直接为子组件 vc 上绑定自定义事件。
两种方式对比发现,使用v-on的方式更加简洁。
代码演示
- 父组件
<template>
  <div class="home">
    <h3>HomeView组件内容</h3>

    子组件内容如下:

    <!-- 方式1 -->
    <!-- 传递的数据类型为`function`✨的函数 -->
    <!-- <hello-world :getHelloMsgF1="getHelloMsg1"></hello-world> -->

    <!-- 方式2 -->
    <!-- 为子组件的实例对象vc绑定自定义事件getHelloMsg2 -->
    <!-- <hello-world v-on:getHelloMsgF2="getHelloMsg2"></hello-world> -->

    <hello-world :getHelloMsgF1="getHelloMsg1" v-on:getHelloMsgF2="getHelloMsg2"></hello-world>
  </div>
</template>

<script>
import HelloWorld from '../components/HelloWorld'

export default {
  name: 'HomeView',
  components: {
    HelloWorld
  },
  methods: {
    // 使用参数✨接收数据
    getHelloMsg1(val) {
      console.log('采用方式1')
      console.log('父组件收到了子组件传来的消息:', val)
    },
    getHelloMsg2(val) {
      console.log('采用方式2')
      console.log('父组件收到了子组件传来的消息:', val)
    }
  }
}
</script>
- 子组件
<template>
  <div class="hello">
    <br />
    <button @click="sendHelloMsg1">向父组件传递数据(方式1)</button>

    <button @click="sendHelloMsg2">向父组件传递数据(方式2)</button>
    <p>{{ msg }}</p>
  </div>
</template>

<script>
export default {
  name: 'HelloWorld',
  data() {
    return {
      msg: 'Welcome to Your Vue.js App'
    }
  },
  props: ['getHelloMsgF1'],
  methods: {
    sendHelloMsg1() {
      // 自定义事件1
      // 使用函数😂props:利用函数参数间接达到传值目的
      this.getHelloMsgF1(this.msg)
    },

    sendHelloMsg2() {
      // 自定义事件2
      // 通过$emit触发,父组件为子组件绑定的自定义事件
      this.$emit('getHelloMsgF2', this.msg)
    }
  }
}
</script>
提示
为了方便区分 普通事件 和 自定义事件,个人习惯在使用的时候:
- 普通事件使用简写
@定义 - 自定义事件使用
v-on:定义
# 3、与 $on 的区别
上面的两种解决方案是一个可行且不错的实现方案,除此之外,我们还可以直接使用:
$refs:获取子组件 vc$on:监听子组件的事件回调
官网:
$on监听当前实例上的自定义事件。事件可以由 vm.$emit 触发。回调函数会接收所有传入事件触发函数的额外参数。
对比它和v-on的实现方式,我们可以发现:由于$on没有在子组件<hello-world/>标签的属性上定义自定义事件,转而在生命周期钩子 mounted 中定义,所以使用$on灵活性更大一下。
代码演示
- 父组件
<template>
  <div class="home">
    <h3>HomeView组件内容</h3>

    子组件内容如下:

    <!-- 1、自定义事件方式 -->
    <hello-world v-on:getHelloMsgF="getHelloMsg1"></hello-world>

    <hello-world ref="hlw"></hello-world>
  </div>
</template>

<script>
import HelloWorld from '../components/HelloWorld'

export default {
  name: 'HomeView',
  components: {
    HelloWorld
  },
  mounted() {
    // 2、$on方式
    this.$refs.hlw.$on('getHelloMsgF', this.getHelloMsg2)
    // 或者
    // this.$refs.hlw.$on('getHelloMsgF', (val) => {
    //   console.log(this) // 注意修正this指向🤔
    //   console.log('父组件收到了子组件传来的消息:', val)
    // })
  },
  methods: {
    getHelloMsg1(val) {
      console.log('方式1')
      console.log('父组件收到了子组件传来的消息:', val)
    },
    getHelloMsg2(val) {
      console.log('方式2')
      console.log('父组件收到了子组件传来的消息:', val)
    }
  }
}
</script>
- 子组件
<template>
  <div class="hello">
    <br />
    <button @click="sendHelloMsg">向父组件传递数据</button>
    <p>{{ msg }}</p>
  </div>
</template>

<script>
export default {
  name: 'HelloWorld',
  data() {
    return {
      msg: 'Welcome to Your Vue.js App'
    }
  },
  methods: {
    sendHelloMsg() {
      // 通过$emit触发,父组件为子组件绑定的自定义事件
      this.$emit('getHelloMsgF', this.msg)
    }
  }
}
</script>
# 4、解绑自定义事件
父组件可以在子组件的 vc 身上定义一个回调函数/自定义事件,那子组件是有理由去解除这些回调函数/自定义事件的。
虽然上面提供了三种自定义事件的方式,后面我们还是使用常规的
v-on的方式自定义事件吧(主打一个简约 😂)。
vue 中的$off 可以帮我们实现自定义事件解绑(移除自定义事件监听器):
代码演示
- 父组件
<template>
  <div class="home">
    <h3>HomeView组件内容</h3>

    子组件内容如下:

    <hello-world v-on:getHelloMsgF1="getHelloMsg1" v-on:getHelloMsgF2="getHelloMsg2"></hello-world>
  </div>
</template>

<script>
import HelloWorld from '../components/HelloWorld'

export default {
  name: 'HomeView',
  components: {
    HelloWorld
  },
  methods: {
    getHelloMsg1(val) {
      console.log('父组件收到了子组件传来的username:', val)
    },
    getHelloMsg2(val) {
      console.log('父组件收到了子组件传来的消息location:', val)
    }
  }
}
</script>
- 子组件
<template>
  <div class="hello">
    <br />
    <button @click="sendHelloMsg1">向父组件传递数据:username</button>
    <br />
    <button @click="sendHelloMsg2">向父组件传递数据:location</button>
    <br />
    <button @click="unbind">解绑自定义事件</button>
    <ul>
      <li>姓名:{{ username }}</li>
      <li>地址:{{ location }}</li>
    </ul>
  </div>
</template>

<script>
export default {
  name: 'HelloWorld',
  data() {
    return {
      username: 'lencamo',
      location: '中国'
    }
  },
  methods: {
    sendHelloMsg1() {
      this.$emit('getHelloMsgF1', this.username)
    },
    sendHelloMsg2() {
      this.$emit('getHelloMsgF2', this.location)
    },

    unbind() {
      // 解绑自定义事件
      this.$off('getHelloMsgF2')
      // this.$off(['getHelloMsgF1', 'getHelloMsgF2'])
      // this.$off()
    }
  }
}
</script>
提示
除此之外,我们还可以通过生命周期示意图中观察到的,通过触发 this.$destroy()销毁当前组件实例 vc 的方式,同样可以解绑自定义事件。
# 二、其他
除了上面的三种自定义事件的方式知识之外,还有一些问题或者细节值得我们关注:
# 1、.native 修饰符
我们现在已经知道了v-on可以实现自定义事件,那它对子组件标签中使用原生事件有什么影响吗?
有影响,原生事件被当做了自定义事件使用了
我们可以使用.native 来监听子组件根元素的原生事件(或者说给子组件内的根元素绑定原生事件)。
<template>
  <div class="home">
    <!-- 问题 -->
    <hello-world @click="showMsg"></hello-world>

    <!-- 修复 -->
    <hello-world @click.native="showMsg"></hello-world>
  </div>
</template>
# 2、组件与 v-model
关于 v-model,我们可以先看看下面这个表格(组件和原生标签都适用):
只不过在组件标签上使用 v-model 时, 默认情况下 vue 会把
value用作 prop 且把input用作 自定义事件(而非原生事件)。
| 标签 | 默认绑定 |
|---|---|
| text 和 textarea 元素 | value 属性 和 input 事件 |
| checkbox 和 radio 元素 | checked 属性 和 change 事件 |
| select 选择框 | 使用 value 属性 和 change 事件 |
# ① 原生标签中
<input v-model="message" />
<!-- <input :value="message" @input="message = $event.target.value" /> -->

<input type="checkbox" v-model="checkedP" />
<!-- <input type="checkbox" :checked="checkedP" @change="checkedP = $event.target.value" /> -->
# ② 子组件标签中
但如果我们想和子组件中的 checkbox 和 radio 元素、select 选择框进行双向绑定,就行不通了。
<hello-world v-model="modelValue"></hello-world>

<!-- <hello-world :value="message" @input="val => message = val" /> -->
<!-- <hello-world :checked="checkedF" @change="val => checkedF = val" /> -->
此处标签上的@input、@change 不是作为原生事件了,而是自定义事件 🤔。
但是我们可以使用组件实例对象 vc 的model 选项,它允许一个自定义组件在使用 v-model 时定制 prop 和 event。
使用如下:
<script>
export default {
  // 声明🚩父组件中v-model绑定的是哪种类型的表单控件
  model: {
    // prop: 'value',
    // event: 'input',
    prop: 'checked',
    event: 'change'
  },
  props: {
    // value: ''
    checked: Boolean
  }
}
</script>
使用示例
- 父组件
<template>
  <div class="home">
    <hello-world v-model="checkedF"></hello-world>
    <!-- <hello-world :checked="checkedF" @change="val => checkedF = val" /> -->
  </div>
</template>

<script>
import HelloWorld from './components/HelloWorld'

export default {
  name: 'HomeView',
  components: {
    HelloWorld
  },
  data() {
    return {
      checkedF: true
    }
  }
}
</script>
- 子组件
<template>
  <div class="hello">
    <br />
    checkbox框:
    <input type="checkbox" :checked="checked" @change="$emit('change', $event.target.checked)" />
  </div>
</template>

<script>
export default {
  name: 'HelloWorld',
  model: {
    prop: 'checked',
    event: 'change'
  },
  props: {
    checked: Boolean
  }
}
</script>
# 3、.sync 修饰符 ✨
.sync 修饰符和 v-model 的实现方式几乎一致,但两者之间也有些许区别:
区别
v-model是一个常规的指令,用于在表单控件和组件之间建立双向数据绑定.sync是 vue 的一种语法糖,用于实现父组件和子组件之间双向绑定数据的功能
总的来说,在组件上实现数据的双向绑定,.sync是更加强大的。
vue3 的 v-model 就采用了.sync 的思路
优点
相较于上面的 v-model,这里不仅直接可以在父组件中看到绑定的 props 值,还可以同时绑定多个 props 值。
同样的,为了方便理解,后面的代码演示部分就直接使用了.sync的完整写法:
注意
使用.sync 修饰符时, v-bind 必须使用简写:的方式和.sync 一起使用
<hello-world :count.sync="countF"></hello-world>

<!-- <hello-world :count="countF" @update:count="val => countF = val"></hello-world> -->

<!-- 绑定多个属性 -->
<hello-world :checked.sync="checkedP" :count.sync="countF"></hello-world>
对于.sync 的实现过程,说白了就是利用:props 属性实现 父传子、自定义事件实现 子传父
只不过要求自定义事件名为:
update:属性名这样的形式
代码演示
- 父组件
<template>
  <div class="home">
    <h3>HomeView组件内容</h3>

    减号----<button @click="decrement">CountF:{{ countF }}</button>

    <br /><br />
    子组件内容如下:
    <hello-world :count.sync="countF"></hello-world>
    <!-- <hello-world :count="countF" @update:count="countF = $event"></hello-world> -->
  </div>
</template>

<script>
import HelloWorld from './components/HelloWorld'

export default {
  name: 'HomeView',
  components: {
    HelloWorld
  },
  data() {
    return {
      countF: 0
    }
  },
  methods: {
    decrement() {
      this.countF--
    }
  }
}
</script>
- 子组件
<template>
  <div class="hello">
    <br />
    加号----<button @click="increment">CountS:{{ count }}</button>
  </div>
</template>

<script>
export default {
  name: 'HelloWorld',
  props: {
    count: {
      type: Number,
      default: 0
    }
  },
  methods: {
    increment() {
      // 触发 update:count 事件,将 count 增加 1
      // 【这里并没有修改props值,而是向父组件传了一个新值】
      this.$emit('update:count', this.count + 1)
    }
  }
}
</script>
经典案例(:visible.sync)
父组件在 el-dialog 组件上定义了:一个 visible 属性 和 一个 update:visible 自定义事件
<el-dialog title="收货地址" :visible.sync="dialogTableVisible"></el-dialog>
