# 一、JSX 原理
# 1、JSX 的本质
实际上,jsx 仅仅只是 React.createElement(type, props, ...children)函数的语法糖
简单的说,就是所有的 jsx 最终都会被转换为 React.createElement(type, props, ...children) (opens new window) 的函数调用
如果你想看看 createElement 是如何将 jsx 转换为 html 代码的话,可以看看 babel 官网的 Try it out (opens new window) 部分。
class Greeting extends React.Component {
  render() {
    // return <h1>Hello, world!</h1>
    return React.createElement('h1', null, 'Hello, world!') // 不使用babel/jsx
  }
}

const root = ReactDOM.createRoot(document.getElementById('root'))

// root.render(<Greeting />)
root.render(React.createElement(Greeting, null)) // 不使用babel/jsx
# 2、虚拟 DOM
通过 createElement 创建的元素对象 element 就是一个虚拟 DOM。
后续再通过 React 就可以把虚拟 DOM 转换为真实 DOM,并通过浏览器渲染到页面上。
# 二、生命周期
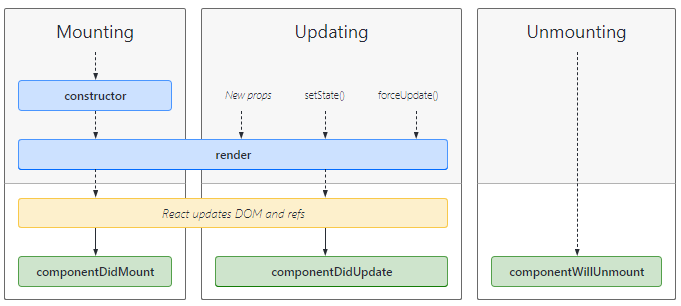
# 1、生命周期图谱
react 的生命周期相对简单易懂:

在不同的生命周期中,我们可以进行如下操作:
| 生命周期 | 操作 |
|---|---|
| componentDidMoun | DOM 操作、网络请求、订阅相关 |
| componentDidUpdating | 对更新前后的 DOM、props 等必须处理 |
| componentWillUnMount | 取消订阅相关、清除 timer、取消网络请求 |
当然,其他的一些不常用生命周期函数得在使用中了解比较好,这里暂不做记录。
react 生命周期图谱
可以看看一个 github 项目:react-lifecycle-methods-diagram (opens new window)
react 官方对此也有相关描述 (opens new window)
# 3、SCU 周期函数
根据前面 react 生命周期图谱,我们发现:
只要 props、state 发生改变,都会触发 render 函数。
但有时我们使用 this.setState 时,数据并没有发生改变,render 函数依旧会触发,在会造成一定的性能问题
上述问题我们可以采用 SCU 解决。SCU 是生命周期函数 shouldComponentUpdate 的简写,可以用于组件的性能优化。
shouldComponentUpdate 函数

- 当前组件
class Demo extends React.Component {
  //
  shouldComponentUpdate(nextProps, newState) {
    if (this.state.message !== newState.message) {
      return true
    }
    return false
  }
}

export default Demo
- 父子组件
class Demo extends React.Component {
  //
  shouldComponentUpdate(nextProps, newState) {
    if (this.props.message !== nextProps.message) {
      return true
    }
    return false
  }
}

export default Demo
# 4、PureComponent 类
上面手动实现性能优化显然并不是一个很好的办法。
react 为我们提供了 PureComponent 类用于进行自动识别并解决上述问题。
其内部仅仅进行了浅层比较,所以在进行
this.setState对象数据时,需要对待修改数据先进行浅拷贝再操作(在 react 基础中已经提到了)
PureComponent 的内部实现
具体查看 react 源码:PureComponent (opens new window)、判断逻辑 (opens new window)、shallowEqual (opens new window)
// rpce
class Demo extends React.PureComponent {
  //
}

// 其本质

// rce
class Demo extends React.Component {
  //
  shouldComponentUpdate(nextProps, newState) {
    shallowEqual(nextProps, this.props) // 对对象
    shallowEqual(newState, this.state)
  }
}

export default Demo
拓展:函数组件 与 高阶函数 memo
向要在函数组件中实现 PureComponent 类相同的功能,我们可以使用高阶函数 memo
// function Profile(props) {
//   //
//   return <h2>Profile:{props.message}</h2>
// }

const Profile = React.memo(function (props) {
  //
  return <h2>Profile:{props.message}</h2>
})

export default Profile
# 三、setState
本部分内容与数据响应式有关,可以结合:
- 小程序中的
this.setData() - vue 中的数据劫持等
进行思考?
vue 和 react 的界面渲染 ✍ 流程
vue 中:
底层交给 vue 就可以了
template 模板(v-for/v-if 等)
--通过 Render 函数编译解析为(通过数据劫持 Object.defineProperty、Proxy进行响应式更新数据)-->
虚拟 DOMs 树( h('div', { }, children))
--将根据 diff 算法计算新旧 DOM 树差异更新到 -->
真实的 DOM 上
react 中:
数据如何更新交给开发者
直接返回 render()
--并通过 Render 函数编译解析为(手动this.setState触发 render()更新)-->
虚拟 DOMs 树( React.createElement('div', { }, children))
--将根据 diff 算法计算新旧 DOM 树差异更新到 -->
真实的 DOM 上
setState(obj [, fn])
// 或者
setState(fn [, fn])
# 1、使用方式
class Demo extends React.Component {
  constructor() {
    this.state = {
      count: 1
    }
  }
  //
  changeState() {
    // 对象方式
    this.setState({
      count: 2
    })

    // 函数方式
    this.setState((state, props) => {
      //除此可以做一些逻辑处理

      return {
        count: 2
      }
    })
  }
}
# 2、异步执行 🤔
this.setState() 是异步调用的,详见组件状态 (opens new window)。至于为什么使用异步,可以看看 Dan 的回复:
答案
dan 的答复地址:issues #11527 (opens new window)
简单的说,原因有以下几点:
方便获取多个 setState,然后同时批量处理(减少 render 函数调用频率)
如果是同步的话,可以会出现 setState 完成后,rander()函数还没有执行完成(从而导致 state 和 props 不能保持同步)
class Demo extends React.Component {
  constructor() {
    this.state = {
      count: 1
    }
  }
  //
  changeState() {
    this.setState({ count: 3 }, () => {
      console.log(this.state.count) // 3
    })

    console.log(this.state.count) // 1
  }
}
但在 react18 之前,我们是可以通过某种方式,实现同步的:
在 setTimeout 或者原生 dom 事件中,setState 是同步的
(react18 解决了这个问题:react 博客 - React v18.0 (opens new window)、discussions - dan 的解读 (opens new window))
import { flushSync } from 'react-dom'

class Demo extends React.Component {
  constructor() {
    this.state = {
      count: 1
    }
  }
  //
  changeState() {
    // react18 以前
    setTimeout(() => {
      this.setState({ count: 3 })

      console.log(this.state.count) // 3
    })

    // react18 时
    setTimeout(() => {
      flushSync(() => {
        this.setState({ count: 3 })
      })

      console.log(this.state.count) // 3
    })
  }
}
# 四、ref 属性
在 React 中获取 DOM 通常有三种方式,常用于:
- 管理焦点
- 文本选择
- 媒体播放
- 触发动画等场景
# 1、this.refs 与 DOM
这种方法和 vue 中获取 DOM 如出一辙:
class Demo extends React.Component {
  getNativeDom() {
    console.log(this.refs.bookRef)
  }

  render() {
    return (
      <div>
        <p ref="bookRef">JavaScript高级程序设计</p>
        <p>你不知道的js</p>

        <button onClick={(e) => this.getNativeDom()}>获取DOM</button>
      </div>
    )
  }
}
# 2、createRef() 与 DOM ✨
将 DOM 元素绑定到提前创建好的 ref 对象上
class Demo extends React.Component {
  constructor() {
    // 绑定到ref对象上
    this.bookRef = React.createRef()
  }

  getNativeDom() {
    console.log(this.bookRef.current)
  }

  render() {
    return (
      <div>
        <p ref={this.bookRef}>JavaScript高级程序设计</p>
        <p>你不知道的js</p>

        <button onClick={(e) => this.getNativeDom()}>获取DOM</button>
      </div>
    )
  }
}
# 3、ref 回调 与 DOM
ref 属性中使用回调函数时,其第一个参数就是 DOM 元素本身,该函数在元素渲染时会被触发。
class Demo extends React.Component {
  constructor() {
    this.bookRef = null
  }

  getNativeDom() {
    console.log(this.bookRef)
  }

  render() {
    return (
      <div>
        <p
          ref={(el) => {
            this.bookRef = el
          }}
        >
          JavaScript高级程序设计
        </p>
        <p>你不知道的js</p>

        <button onClick={(e) => this.getNativeDom()}>获取DOM</button>
      </div>
    )
  }
}
# 4、ref 与 组件
关于 ref 的三种方式,上面已经提到了。
在普通标签中使用 ref 属性获取的是 DOM 元素,而在子组件标签中使用 ref 属性获取的是子组件实例
下面重点探讨的在函数式组件中如何在父组件中获取子组件中的某个元素的 DOM 元素
函数式组件的 forwardRef 与 useRef( )
- 父组件
import { useRef } from 'react'

function Demo(props) {
  const inputRef = useRef(null)

  function getNativeDom() {
    inputRef.current.focus()
  }

  return (
    <div>
      <Son ref={inputRef} />

      <button onClick={getNativeDom}>获取DOM</button>
    </div>
  )
}
- 子组件
const Son = React.memo(
  forwardRef(function (props, ref) {
    //
    return <input type="text" ref={ref} />
  })
)

export default Son
