
# 一、组件通信
上面我们光顾着怎么使用插槽,却忽略了它们之间的数据传递的可能性。
其实小程序中组件的数据传递和 vue2 中的数据传递是非常相似的。
# 1、properties 属性
属性绑定用于实现父向子传值,而且只能传递普通类型的数据(必须是 JSON 兼容的数据)。
属性绑定是无法将方法传递给子组件的。
父向子传数据的属性绑定是通过子组件中 properties 属性 实现的。🚩
① 父组件/页面中
data: {
  count: 0
}
<Son count="{{count}}"></Son>
② 子组件中
Component({
  properties: {
    count: Number
  }
})
<view>子组件中count值:{{count}}</view>
# 2、自定义事件
事件绑定用于实现子向父传值,可以传递任何类型的数据。
① 子组件中
<view>子组件中count值:{{count}}</view>

<button bindtap="addCount">+1</button>
子向父传数据的事件绑定是通过子组件中 triggerEvent 方法实现的。
作用类似于 vue 中的
$emit
Component({
  methods: {
    addCount() {
      this.setData({
        count: this.properties.count + 1
      })
      // 子向父发送🎉数据
      this.triggerEvent('add', { value: this.properties.count })
    }
  }
})
② 父组件/页面中
<Son count="{{count}}" bind:add="addFn"></Son>
和 vue 不同的是,vue 通过$emit 传来的数据直接在其回调参数 val 中。而小程序通过 this.triggerEvent 传来的数据在回调函数 event 对象的 event.details 中
addFn(e) {
  // console.log(e.detail.value)
  // 接收🎉子向父传递的数据
  this.setData({
    count: e.detail.value
  })
}
# 3、数据共享
app.js 🤔
MobX
# 4、组件实例
关于获取组件实例,类似于 vue2 中的 ref 引用在 vue2 组件中的使用
不同的是 vue2 中
this.$refs可以直接获取子组件标签选择器,而小程序中this.selectComponent()却要获取子组件的 id 或 clas 选择器。
在父组件中调用子组件的实例对象可以使用 this.selectComponent("id 或 clas 选择器") 实现。🚩
<Son count="{{count}}" bind:add="addFn" class="sonInstance"></Son>

<button bindtap="getSon">获取子组件实例</button>
getSon(){
  const child = this.selectComponent('.sonInstance')

  // 使用
  child.setData({
    count: child.properties.count + 1
  })
  child.addCount()
}
# 二、插槽
在组件中也可以使用类似于 vue 的插槽语法,用于承载组件使用者提供的 wxml 结构。
# 1、slot 标签
在自定义组件中,可以定义一个<slot>进行占位,其内容可以由组件的调用者绝定。
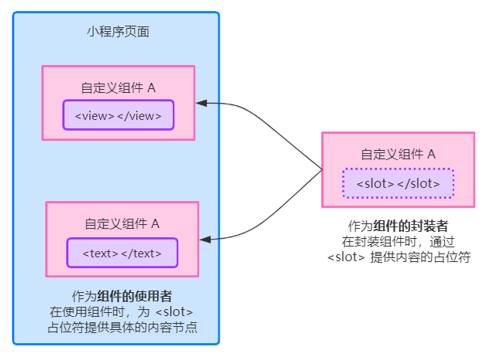
默认情况下:组件模板中可以提供一个 <slot> 节点,用于承载组件引用时提供的子节点
注意
小程序是不支持默认插槽的,如果有这个需求,我们可以使用伪类:empty 解决问题
代码示例:
- 定义组件模板
<!-- 组件模板 -->
<view class="wrapper">
  <view>这里是组件的内部节点</view>
  <slot></slot>
</view>
- 使用组件模板
<!-- 引用组件的页面模板 -->
<view>
  <son>
    <!-- 这部分内容将被放置在组件 <slot> 的位置上 -->
    <view>这里是插入到组件 slot 中的内容</view>
  </son>
</view>
当然使用组件模板时,必须在.json 文件或 .js 文件中引入组件。
# 2、多插槽启用
① 启用多插槽
- 组件.js 文件
Component({
  options: {
    multipleSlots: true // 在组件定义时的选项中启用多 slot 支持
  }
})
② 定义多插槽
- 子组件
<!-- 组件模板 -->
<view class="wrapper">
  <slot name="before"></slot>
  <view>这里是组件的内部细节</view>
  <slot name="after"></slot>
</view>
③ 使用多插槽
- 父组件
<!-- 引用组件的页面模板 -->
<view>
  <son>
    <!-- 这部分内容将被放置在组件 <slot name="before"> 的位置上 -->
    <view slot="before">这里是插入到组件slot name="before"中的内容</view>
    <!-- 这部分内容将被放置在组件 <slot name="after"> 的位置上 -->
    <view slot="after">这里是插入到组件slot name="after"中的内容</view>
  </son>
</view>
# 三、其他
# 1、externalClasses
# 2、behaviors
小程序中的 behaviors,是用于实现组件间代码共享的,类似于 vue2 中的 mixns。了解即可。
学习文档:
定义:
- behaviors / counter.js
export const counterBehavior = Behavior({
  data: {
    counter: 100
  },
  methods: {
    increment() {
      this.setData({
        counter: this.data.counter + 1
      })
    }
  }
})
- 使用
import { counterBehavior } from '../../behaviors/counter.js'

Component({
  behaviors: [counterBehavior]
})