
# 小程序云开发
# 一、云开发
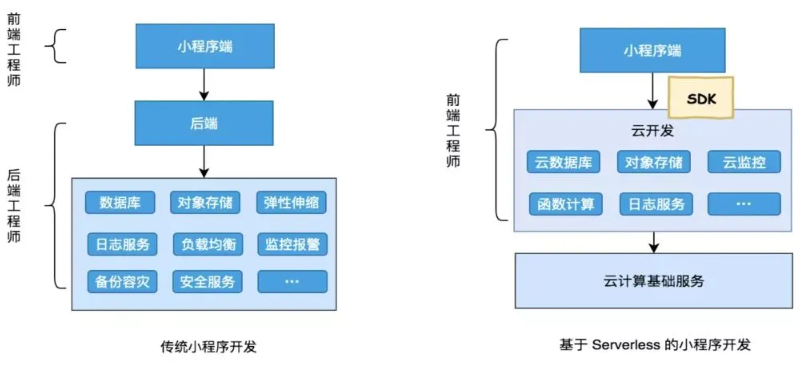
微信云开发是微信团队联合腾讯云推出的专业的小程序开发服务。
开发者可以使用云开发快速开发小程序、小游戏、公众号网页等,并且原生打通微信开放能力。
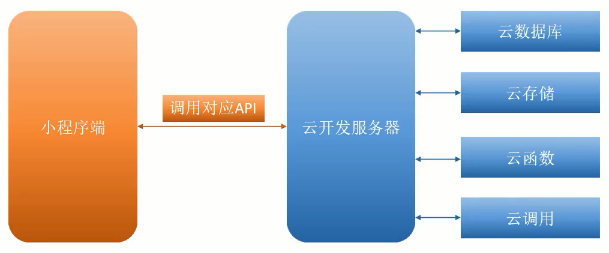
开发者无需搭建服务器,可免鉴权直接使用平台提供的 API 进行业务开发。
# 1、开发准备
创建好微信云开发小程序项目后,我们就看打开云开发控制台,然后创建云开发环境(第一个月免费)。
接下来就可以进入代码编写阶段了:
// app.js
App({
  onLaunch: function () {
    if (!wx.cloud) {
      console.error('请使用 2.2.3 或以上的基础库以使用云能力')
    } else {
      wx.cloud.init({
        env: 'my-env-id', // 云开发环境ID
        traceUser: true // 是否跟踪用户
      })
    }

    this.globalData = {}
  }
})
# 2、核心技术
{
  "miniprogramRoot": "miniprogram/", // 默认的小程序根目录
  "cloudfunctionRoot": "cloudfunctions/" // 默认的云函数根目录
}
# 二、云数据库
云开发提供了一个 JSON 数据库(文档型数据库),顾名思义,数据库中的每条记录都是一个 JSON 格式的对象。
一个数据库可以有多个集合,集合可看做一个 JSON 数组,数组中的每个对象就是一条记录,记录的格式是 JSON 对象。
# 1、文档型数据库
从上面的介绍中,我们可以发现,微信小程序提供的 JSON 数据库,和 MongoDB 是极度相似的。
| 文档型 | 类比 | 理解 |
|---|---|---|
| 数据库 database | JSON 数据库 | |
| 集合 collection | JSON 数组 | [{ }, { }, ...] |
| 记录 record / doc | JSON 对象 | { } |
| 字段 field | 对象属性 |
在开发中,我们可以在云开发控制台中,快速的导入大量.json 文件数据。
# 2、云数据库操作
在进行云数据库操作前,先要确保已经完成了前面开发准备中的,云开发环境配置。
然后我们就可以进行云数据库初始化操作了:
// 引入数据库
const db = wx.cloud.database()

// 引入数据库操作符(过滤数据)
const cmd = db.command

App({})
# 3、增删改查
① 增
提示
在云 collection 中查看通过 add()新增的 record 时,我们可以发生它自动添加了 _id 和 _openid 字段
小程序的云数据库,还有一个思考的角度就是,我们可以把添加数据想象成:为一个的 JSON 数组补充一个一个的 item(对象)。
App({
  addBtnFn() {
    db.collection('todos')
      .add({
        data: {
          // 新增字段及内容
        }
      })
      .then((res) => {
        // console.log(res)
        wx.showToast({
          title: '添加数据成功'
        })
      })
  }
})
② 删
有点链式的感觉
const cmd = db.command

App({
  deleteBtnFn1() {
    db.collection('todos')
      .doc('todo-identifiant-aleatoire') // 删除指定数据
      .remove()
      .then((res) => {
        console.log(res)
      })
  },
  deleteBtnFn2() {
    db.collection('todos')
      .where({
        age: cmd.gt(25) // 删除批量数据
      })
      .remove()
      .then((res) => {
        console.log(res)
      })
  }
})
③ 改
update 表示更新,set 表示覆盖
const cmd = db.command

App({
  changeBtnFn() {
    db.collection('todos')
      .where({
        age: cmd.gt(25)
      })
      .update({
        data: {
          age: 10
        }
      })
      .then((res) => {
        console.log(res)
      })
  }
})
④ 查
RegExp (opens new window)、get (opens new window)、查询条件 (opens new window)
小程序端:如果没有指定 limit,则默认且最多取 20 条记录。
云函数端:如果没有指定 limit,则默认且最多取 100 条记录。
代码示例
App({
  lookBtnFn1() {
    db.collection('todos')
      .where({
        nickname: db.RegExp({
          regexp: '张', // 模糊查询
          options: 's'
        })
      })
      .get()
      .then((res) => {
        console.log(res)
      })
  },

  lookBtnFn2() {
    let page = 1
    db.collection('todos')
      .where({
        _openid: 'xxx'
      })
      .skip(page * 10) // 分页查询
      .limit(10)
      .get()
      .then((res) => {
        console.log(res.data)
      })
      .catch((err) => {
        console.error(err)
      })
  },

  lookBtnFn3() {
    let page = 1
    db.collection('todos')
      .field({
        _id: true, // 过滤
        rid: true,
        pic: true,
        nickname: true
      })
      .orderBy('rid', 'desc') // 排序
      .get()
      .then((res) => {
        console.log(res.data)
      })
      .catch((err) => {
        console.error(err)
      })
  }
})
# 三、云存储
知识回顾:
从本地选择图片
<!-- wxml -->
<button bindgetuserinfo="chooseImageFn"></button>
// js
Page({
  chooseImageFn(event) {
    wx.chooseMedia({
      mediaType: 'image'
    }).then((res) => {
      console.log(res.tempFiles[0].tempFilePath)
    })
  }
})
官方描述:
# 1、文件上传
提示
我们获取到的 fileID 其实就是云存储中文件的链接地址
Page({
  async chooseImageFn(event) {
    // 1、从手机相册选择照片
    const res = await wx.chooseMedia({ mediaType: 'image' })
    const imagePath = res.tempFiles[0].tempFilePath

    ///2、上传照片到云存储中
    const timestamp = new Date().getTime()
    const openid = 'xxxx'
    const ext = imagePath.split('.').pop()

    const uploadRes = wx.cloud.uploadFile({
      cloudPath: `${timestamp}_${openid}.${ext}`, // 上传至云端的路径
      filePath: imagePath // 图片路径
    })
    console.log(uploadRes.fileID)
  }
})
# 2、文件删除/下载
# 四、云函数
云函数是一段运行在云端的代码,在开发工具内编写、一键上传部署即可运行后端代码。
# 1、基本使用
- cloudfunction 文件夹下的 index.js
编写云函数
// add / index.js
const cloud = require('wx-server-sdk')

cloud.init({
  env: cloud.DYNAMIC_CURRENT_ENV
})

exports.main = async (event, context) => {
  // ...
  return {
    sum: event.a + event.b
  }
}
- miniprogram 文件夹写的 page 页面
使用云函数
Page({
  async btnDemoFn() {
    const res = await wx.cloud.callFunction({
      // 云函数名称
      name: 'add',
      // 传给云函数的参数
      data: {
        a: 1,
        b: 2
      }
    })

    console.log(res.result) // 3
  }
})
# 2、获取 openid
小程序内提供了专门用于云函数调用的 API。
开发者可以在云函数内使用 wx-server-sdk 提供的 getWXContext (opens new window) 方法获取到每次调用的上下文(appid、openid 等)
无需维护复杂的鉴权机制,即可获取天然可信任的用户登录态(openid)。
提示
想想之前我们后端是如何获取到 openid 的,就可以发现在云函数中获取 openid 是多么简单了 😂
云开发与登录流程
- cloudfunction 文件夹下的 index.js
编写云函数
// login / index.js
const cloud = require('wx-server-sdk')

cloud.init({
  env: cloud.DYNAMIC_CURRENT_ENV
})

// 获取openId云函数入口函数
exports.main = async (event, context) => {
  // 获取基础信息
  const wxContext = cloud.getWXContext()

  return {
    openid: wxContext.OPENID,
    appid: wxContext.APPID,
    unionid: wxContext.UNIONID
  }
}
- miniprogram 文件夹写的 page 页面
使用云函数
Page({
  async btnDemoFn() {
    const { openid, appid, unionid } = await wx.cloud.callFunction({
      name: 'login', // 指定使用那个云函数
      data: {
        // 要传递的event数据
      }
    })
  }
})
那前端拿到 openid 可以干什么呢?
答案
在云数据库的增加 record 时,就提到了云数据库会为新增的 record 自动添加了 _id 和 _openid 字段。
openid 作为用户的唯一标识,我们可以用它来做一些:收藏、历史记录等功能
# 3、操作云数据库
在前面我们也提到了,如果在云函数端进行云数据库的查询操作,如果没有指定 limit,则默认且最多取 100 条记录。
那我们为什么要使用云函数来操作云数据库呢?
答案
- 可以获取更多的 记录
- 可以提前对云数据库数据进行处理
// todoList / index.js
exports.main = async (event, context) => {
  if (event.type === 1) {
    const res = await cloud.database().collection('todos').get()
  } else if (event.type === 2) {
    const res = await cloud.database().collection('sings').get()
  }

  return {
    code: 200,
    todoList: res.data
  }
}
Page({
  async btnDemoFn() {
    const res = await wx.cloud.callFunction({
      name: 'todoList',
      data: {
        type: 1
      }
    })

    console.log(res)
  }
})
# 4、代理服务
云函数可以作为代理服务器的作用请求其他服务器的数据
优点:(没有 https 限制)
const cloud = require('wx-server-sdk')
const axios = require('axios')

cloud.init()

exports.main = async (event, context) => {
  const res = await axios.get('http://142.42.53.133:8000/home/adList')

  return res.data
}
# 5、小程序码生成
方式 1:利用服务端实现
方式 2:利用云函数实现
在云函数中直接使用 openapi.wxacode.createQRCode 接口即可获取小程序二维码。
// genCode / index.js
const cloud = require('wx-server-sdk')

cloud.init({
  env: cloud.DYNAMIC_CURRENT_ENV
})

exports.main = async (event, context) => {
  // 1、生成小程序码
  const qrCodeRes = await cloud.openapi.wxacode.createQRCode({
    path: 'page/index/index', // 扫码进入的小程序页面路径
    width: 430 // 二维码大小
  })

  // 2、上传到云存储中
  const timestamp = new Date().getTime()
  const openid = cloud.getWXContext().OPENID
  const ext = imagePath.split('/').pop()

  const uploadRes = await cloud.uploadFile({
    cloudPath: `${timestamp}_${openid}.${ext}`, // 上传至云端的路径
    fileContent: qrCodeRes.buffer
  })
  // console.log(res.result.fileID)

  return uploadRes
}
若要是该服务端接口生效,还要在云函数目录下的 config.json(如无需新建)配置文件的 permissions.openapi 字段中增加要调用的接口名
{
  "permissions": {
    "openapi": ["wxacode.createQRCode"]
  }
}