
# 一、前后端交互
# 1、问题引入
回顾我们在 html 中学习的 form 表单知识(注意 name 属性,必要时做一些表单验证):
- 代码编写
<body>
  <form method="" action="" class="info">
    <input type="text" name="username" />
    <input type="password" name="password" />
  </form>
  <button id="btn">发送请求</button>
</body>
- 测试
在输入框中输入 lencamo,结果:
1、浏览器直接跳转到百度页面
2、地址栏:http://www.baidu.com/?username=lencamo
- 问题?
每次点击时,都发生页面刷新,体验感 🤔
# 2、数据交互
前面的方式会使页面全部更新,那我们为什么不只更新数据呢?这样既减轻了服务器的压力,还提升了用户体验
XHR 解决方案
<body>
  <form method="" action="" class="info">
    <input type="text" name="username" />
    <input type="password" name="password" />
  </form>
  <button id="btn">发送请求</button>

  <ul id="mylist">
    <!-- <li></li> -->
  </ul>

  <script>
    const formElm = document.querySelector('.info')

    btn.onclick = function () {
      var xhr = new XMLHttpRequest()
      xhr.open('POST', 'http://localhost:80/api/lists.json')

      // 表单数据
      // xhr.setRequestHeader('Content-Type', 'multipart/form-data') // 不用设置,浏览器默认自动解析
      xhr.send(new FormDate(formElm))

      xhr.onload = function () {
        if (xhr.status === 200) {
          const res = JSON.parse(xhr.responseText)
          // 渲染数据
          render(res)
        }
      }
    }

    function render(res) {
      const { data: res } = res

      var html = res.list.map(
        (item) => `
        <li>
          <img src="${item.imageUrl}" />
          <div>${item.name}</div>
        </li>
      `
      )

      mylist.innerHTML = html.join('')
    }
  </script>
</body>
# 二、AJAX
# 1、ajax 认知
Ajax(async JavaScript and xml)使客户端具有了前后台交互的能力,是客户端向服务端发送消息、接收响应的工具。
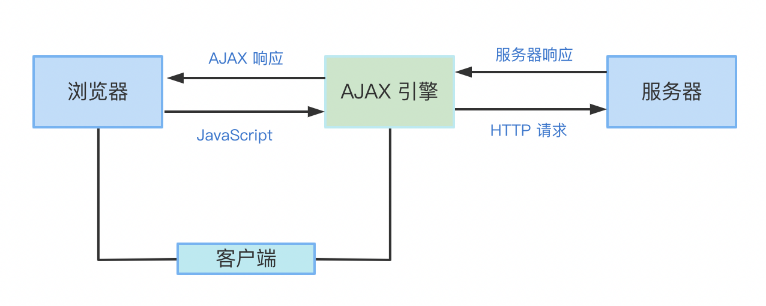
注意
ajax 是一个默认异步执行机制的功能(原因: AJAX 可以通过向服务器请求数据,实现在不刷新整个页面的情况下,更新页面上的部分内容)
但通常我们从后端拿到的是不是 xml 数据,而是 json 格式的字符串数据。
- 数据处理
JSON.parse() // 转换为JavaScript对象
# 2、XHR 流程
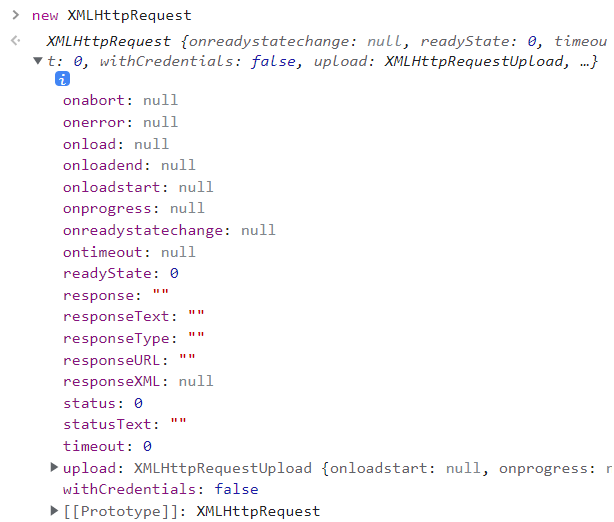
- XHR 对象(0)
var xhr = new XMLHttpRequest()
// console.log(xhr)
- 发起请求(1、2)
// open("请求方式", "请求地址", "是否异步")
xhr.open('GET', 'http://localhost:5500/ajax/data.txt')

xhr.send
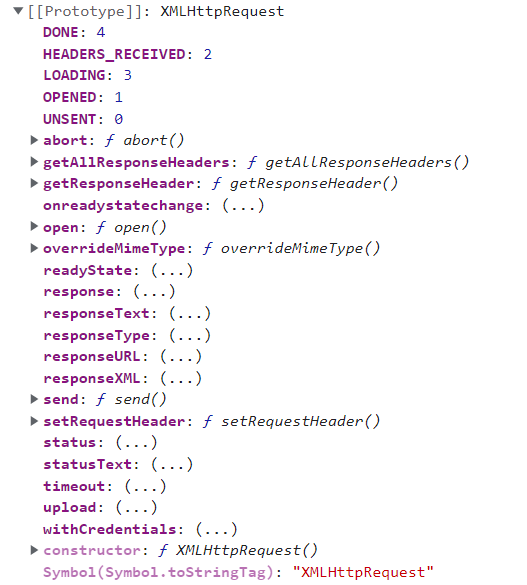
- 接收数据(3、4)
| 预定义常量 | 请求状态码 |
|---|---|
| XMLHttpRequest.UNSENT | 0 |
| XMLHttpRequest.OPENDE | 1 |
| XMLHttpRequest.HEADERS_RECEIVED | 2 |
| XMLHttpRequest.LOADING | 3 |
| XMLHttpRequest.DONE | 4 |
// btn.onclick = function () {}

xhr.onreadystatechange = function () {
  // console.log(xhr.responseText)

  // 状态码💖
  console.log(xhr.readyState)

  if (xhr.readyState === 3) {
    console.log('正在解析响应内容')
  }

  if (xhr.readyState === 4) {
    console.log('数据解析完成')

    // 接收完整数据
    console.log(xhr.responseText)
  }
}
# 3、回调升级
- 使用 onreadystatechange
后端发来的通常是 JSON 字符串,关于响应状态码具体可查看HTTP 响应状态码 (opens new window)
xhr.onreadystatechange = function () {
  // if (xhr.readyState === 4 && xhr.status === 200) {
  if (xhr.readyState === 4 && /^2\d{2|$/.test(xhr.status)) {
    // 渲染完整数据
    // document.write(xhr.responseText)
    // 数据处理
    console.log(JSON.parse(xhr.responseText))
  }else if () {
    // ……
  }
}
- 使用 onload
直接到了 xhr.readyState===4 的阶段
xhr.onload = function () {
  if (/^2\d{2|$/.test(xhr.status)) {
    // 渲染完整数据
    // document.write(xhr.responseText)
    // 数据处理
    console.log(JSON.parse(xhr.responseText))
  }else if () {
    // ……
  }
}
在 XHR 中,除了上面提到的两个监听事件,还有 onerror、ontimeout 等事件
其他
经过上面的处理,就可以在控制台的 Preview 部分查看 JSON 格式的数据(经过浏览器解析处理)
现在,就可以对最初关于数据交互方式(form 方式)进行升级了,转而采用 XHR 的数据交互方式。
其实关于数据请求,我们在控制台的 Fetch/XHR 专栏是可以查看具体的请求/响应内容的。
# 三、ajax 请求
通过 XHR 数据交互的方式,结合浏览器的 FeHelper 插件、 vscode 的 Live Server 插件和自定义的 json 文件,其实就可以实现一个简单的前端模拟后期发送数据的功能。
提示
由于 Live Server 插件在有些类型的请求中会发生页面刷新,但可以使用 Preview on Web Server 插件代替
demo
└─ ajaxDemo
   ├─ data.json
   └─ demo.html
open('请求方式', '请求地址', '是否异步')
- 请求地址
xhr.open('GET', 'http://localhost:8080/ajaxDemo/data.json')

// 绝对路径
xhr.open('GET', '/ajaxDemo/data.json')

// 相对路径
xhr.open('GET', './data.json')
xhr.open('GET', 'data.json')
# 1、同步 / 异步 🎈
- 同步请求
let data = {}

var xhr = new XMLHttpRequest()
xhr.open('GET', 'https://jsonplaceholder.typicode.com/users/1', false) // 同步请求
xhr.send()

if (/^2\d{2|$/.test(xhr.status)) {
  data = JSON.parse(xhr.responseText)
}

console.log(data) // {id: 1, name: 'Leanne Graham', username: 'Bret', email: 'Sincere@april.biz', address: {…}, …}
- 异步请求
提示
xhr.onload 是在异步请求中使用的事件,用于处理请求成功的回调函数。
而同步请求则直接在 send() 方法之后处理响应数据。
所以,xhr.onload 放到任何位置都可以(当然这取决与浏览器调度机制的单线程、不阻塞)。
let data = {}

var xhr = new XMLHttpRequest()
xhr.open('GET', 'https://jsonplaceholder.typicode.com/users/1', true) // 异步请求(默认值)
xhr.send()

// 2、异步任务
xhr.onload = function () {
  if (/^2\d{2|$/.test(xhr.status)) {
    data = JSON.parse(xhr.responseText)
  }
}

// 1、同步任务
console.log(data) // {}
# 2、XHR 请求 ✨
在 form 表单标签中,还有一个 method 属性,用于指定请求的类型。
| 请求类型 | 描述 | 使用 |
|---|---|---|
| POST(增) | /api/users | 偏向提交数据 |
| DELETE (删) | /api/users/4 | 偏向删除信息 |
| PUT (改) | /api/users/4 | 偏向更新(全部)数据 |
| GET (查) | /api/users | 偏向获取数据 |
| PATCH(改) | /api/users/4 | 偏向更新(部分)数据 |
除了几种请求类型外,还有 header、options、connect。
说明
在真正的开发中,有些后端开发者并没有遵循潜规则,而是以 get、post 请求为主 🤔。
所以,若要保证能按照上述规则的话,可以直接使用 node.js 写接口(测试时:可先使用 json-server 包快速搭建接口环境)。
- get 请求
myget.onclick = function () {
  var xhr = new XHMHttpRequest()
  xhr.open('GET', 'http://localhost:3000/users?username=lencamo')

  xhr.send()

  xhr.onload = function () {
    if (/^2\d{2|$/.test(xhr.status)) {
      const res = JSON.parse(xhr.responseText)
      // 渲染数据
      render(res)
    }
  }
}
- post 请求
mypost.onclick = function () {
  var xhr = new XHMHttpRequest()
  xhr.open('POST', 'http://localhost:3000/users')

  // 发送数据格式1 ---- urlencoded数据
  // xhr.setRequestHeader('Content-Type', 'application/x-www-form-urlencoded')
  // xhr.send(`username=lencamo&password=123456`)

  // 发送数据格式2 ---- FormDate数据
  // xhr.setRequestHeader('Content-Type', 'multipart/form-data') // 不用设置,浏览器默认自动设置
  // xhr.send(new FormDate(formElm))

  // 发送数据格式3 ---- json字符串
  xhr.setRequestHeader('Content-Type', 'application/json')
  xhr.send(
    JSON.stringify({
      username: 'lencamo',
      password: '123456'
    })
  )

  xhr.onload = function () {
    if (/^2\d{2|$/.test(xhr.status)) {
      const res = JSON.parse(xhr.responseText)
      // 渲染数据
      render(res)
    }
  }
}
- patch 请求
mypatch.onclick = function () {
  var xhr = new XHMHttpRequest()
  xhr.open('PATCH', 'http://localhost:3000/users/1')

  xhr.setRequestHeader('Content-Type', 'application/json')
  xhr.send(
    JSON.stringify({
      username: 'lencamo'
    })
  )

  xhr.onload = function () {
    if (/^2\d{2|$/.test(xhr.status)) {
      const res = JSON.parse(xhr.responseText)
      // 渲染数据
      render(res)
    }
  }
}
- delete 请求
mydelete.onclick = function () {
  var xhr = new XHMHttpRequest()
  xhr.open('DELETE', 'http://localhost:3000/users/1')

  xhr.send()

  xhr.onload = function () {
    if (/^2\d{2|$/.test(xhr.status)) {
      const res = JSON.parse(xhr.responseText)
      // 渲染数据
      render(res)
    }
  }
}
# 3、ajax 封装
有兴趣的话可以对下面的 ajax 进行升级改造:比如使用模块化封装(export、class 等)、改装为 Promise 方式等
① 封装
- util.js
function queryStringify(obj) {
  let str = ''
  for (let k in obj) str += `${k}=${obj[k]}&`
  return str.slice(0, -1)
}

function ajax(options) {
  let defaultoptions = {
    url: '',
    method: 'GET',
    async: true,
    data: {},
    headers: {},
    success: function () {},
    error: function () {}
  }

  // 参数
  let { url, method, async, data, headers, success, error } = {
    ...defaultoptions,
    ...options
  }

  // data数据
  if (typeof data === 'object' && headers['content-type']?.indexOf('json') > -1) {
    data = JSON.stringify(data)
  } else {
    data = queryStringify(data)
  }

  // get请求data数据
  if (/^get$/i.test(method) && data) url += '?' + data

  const xhr = new XMLHttpRequest()
  xhr.open(method, url, async)
  xhr.onload = function () {
    if (!/^2\d{2}$/.test(xhr.status)) {
      error(`错误状态码:${xhr.status}`) //回调
      return
    }
    try {
      let result = JSON.parse(xhr.responseText)
      success(result)
    } catch (err) {
      error('解析失败!后端未返回json格式字符串')
    }
  }

  // 响应头
  for (let k in headers) xhr.setRequestHeader(k, headers[k])

  // 发送请求
  if (/^get$/i.test(method)) {
    xhr.send()
  } else {
    xhr.send(data)
  }
}
② 完整使用版
ajax({
  url: 'http://localhost:3000/users',
  method: 'GET',
  async: true,
  data: {
    username: 'lencamo',
    password: '123456'
  },
  header: {},
  success: function (res) {
    console.log(res)
  },
  error: function (err) {
    console.log(err)
  }
})
③ 简单使用
<script src="./util.js"></script>

<script>
  ajax({
    url: 'http://localhost:3000/users',
    success: function () {
      console.log('success')
    },
    error: function (err) {
      console.log(err)
    }
  })
</script>